AWS EC2, or Amazon Elastic Compute Cloud, is a web service provided by Amazon Web Services (AWS) that allows you to rent virtual servers in the cloud. Let's break down this definition for a non-technical audience:
Amazon Web Services (AWS): AWS is a cloud computing platform offered by Amazon. Instead of running software or storing data on your local computer or servers, you can use AWS to access computing power, storage, and other resources over the internet.
Elastic Compute Cloud (EC2): EC2 is a specific service within AWS. It's like renting a virtual computer in the cloud. This virtual computer is called an "instance." These instances can be customized to meet your specific needs regarding computing power, memory, and storage.
Virtual Servers: When we say "virtual servers," think of them as computers that exist in the cloud. They don't physically exist; instead, they run on powerful servers maintained by AWS. You can use these virtual servers for various purposes, such as running applications, hosting websites, or processing data.
Renting: Rather than buying and maintaining physical servers, you pay for the computing resources you use. It's like renting a computer for a specific period, and you can scale up or down based on your needs. This flexibility is one of the key advantages of cloud computing.
In summary, AWS EC2 is a service that lets you easily and flexibly rent virtual computers in the cloud. This helps businesses and individuals access computing power without the need to invest in and manage physical hardware.
Deploying an EC2 Instance
Navigate to AWS Console:
Begin by logging into your AWS account and accessing the AWS Management Console. If you don't have an account, you can easily create one to start exploring the world of cloud computing.

Access EC2 Service:
Once logged in, find and select the EC2 service. This is where the magic happens – where you'll launch, manage, and monitor your virtual servers.

Launch Your Instance:
Click on the "Launch Instance" button to initiate the instance creation process. Here, you'll be prompted to choose an Amazon Machine Image (AMI), which is essentially the software configuration for your virtual server.

Enter the name of the instance which you want to configure. Also in the AMI section, select the Operating System which you want to run.
Select Instance Type:
Next, select the type of instance you need. AWS offers a variety of instances optimized for different use cases – from general-purpose to compute-optimized and memory-optimized instances.

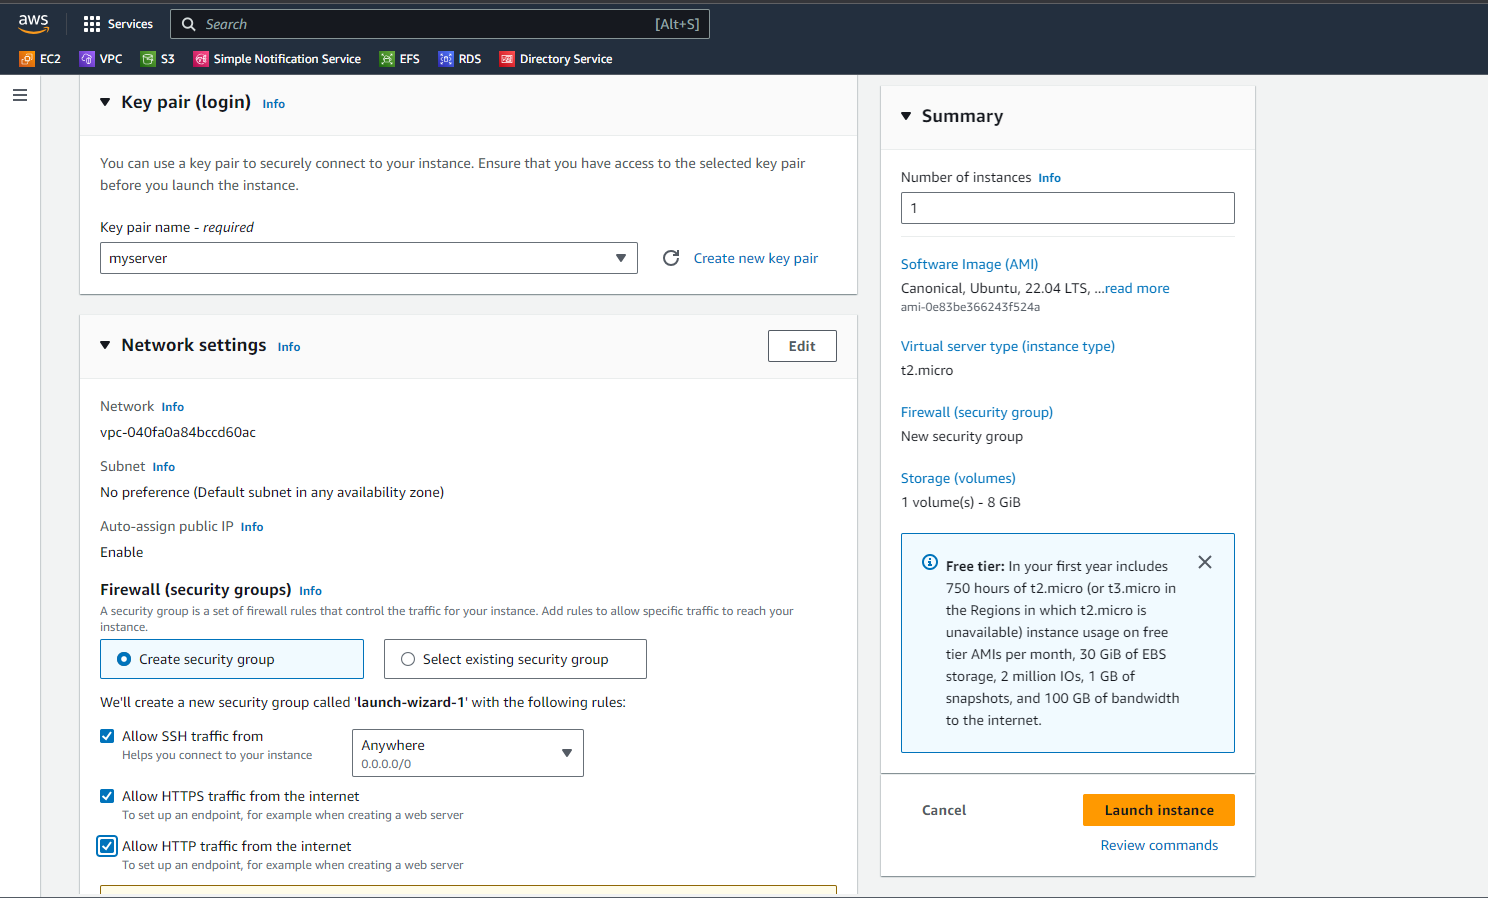
We are selecting "t2.micro" as this is free for ~750 hours in the first year of your new AWS account.
Configure Instance:
Customize your instance by specifying details such as the key pair, number of instances, network settings, and storage requirements. This is where you tailor the virtual environment to meet your specific needs.
Key pair: In AWS EC2, a key pair is a set of security credentials that consists of a public key and a private key. This key pair is used to securely connect to and authenticate with your EC2 instances. Let's break down the key concepts:
Public Key:
The public key is shared and can be freely distributed. It's used by AWS to encrypt data that can only be decrypted with the corresponding private key.
When you launch an EC2 instance, you specify the key pair to be associated with the instance. The public key is then embedded in the instance, allowing for secure communication.
Private Key:
The private key is kept secret and should only be known to the owner. It's used to decrypt data that was encrypted with the corresponding public key.
You must securely store your private key because it is essential for accessing your EC2 instances. Losing the private key means losing access to the instances associated with that key pair.

Create a new key pair by providing a name, selecting the key pair type, and choosing the Private key file format. In our example, we are using .pem as the file format.
Configure Security Groups:
Security is a top priority. Define rules to control inbound and outbound traffic to your instance by configuring security groups. This ensures that your virtual server is protected from unauthorized access.

In the Network settings, we are opting for the default VPC. In the security group configuration, we are allowing SSH (port 22), HTTPS (port 443), and HTTP (port 80) to ensure that the necessary network traffic can reach the instance securely.
Add Storage:
Determine the storage capacity required for your instance. You can add and configure additional volumes depending on your application and data storage needs.

We are configuring 8 GiB of storage which is EBS storage.
Review and Launch:
Before finalizing, review your configuration settings. If everything looks good, hit the "Launch" button. You'll be prompted to select or create a key pair for secure access to your instance.

Congratulations! We've just initiated the launch sequence for our EC2 instance.
Conclusion
To sum it up, AWS EC2 is like having your own virtual computer in the cloud. It's a smart way to use computing power without dealing with physical machines. We've learned how to set up an EC2 instance, and the cool thing is, it's not just about computers – it's about having a flexible and cost-effective solution for all sorts of projects.
So, with AWS EC2, you can focus on your work or projects without worrying about the technical details. It's like having a powerful, customizable computer on demand. As technology advances, EC2 keeps up, providing a reliable foundation for various applications. It's your ticket to a hassle-free and scalable computing environment in the cloud.
