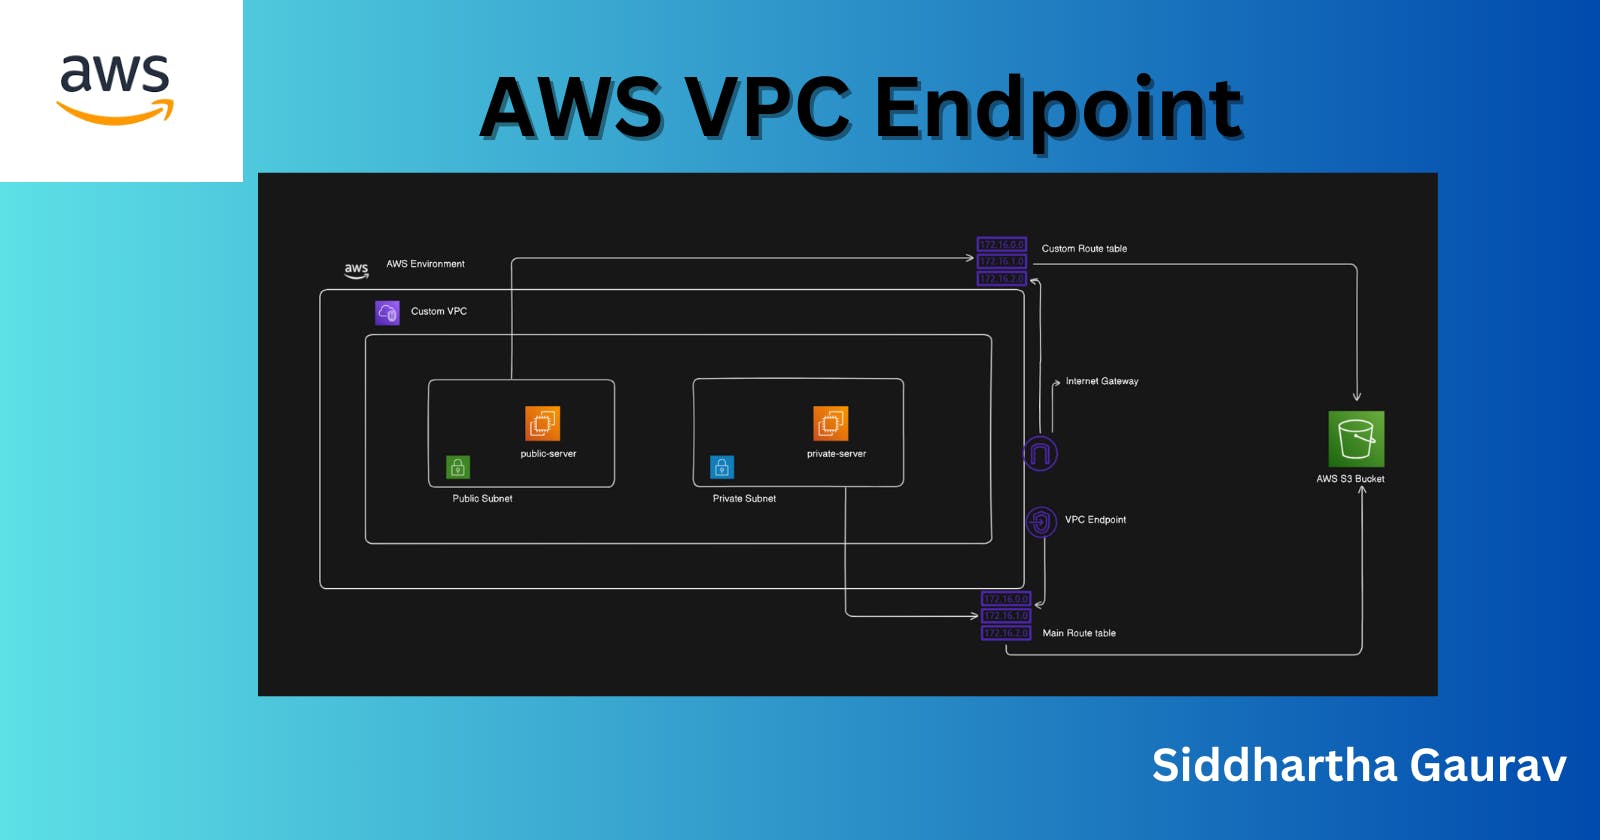
Have you ever wondered how data travels from one place to another on the internet? Well, imagine the internet as a vast network of roads, and the data as cars traveling on those roads. Just like roads have intersections and checkpoints, the internet has points where data can enter or exit. One important concept in this realm is called a VPC Endpoint.
What is a VPC Endpoint?
VPC stands for Virtual Private Cloud. It's like your own private corner of the internet, where you can run your applications securely. Now, an endpoint in this context is like a special doorway that connects your private space (VPC) to services outside, such as databases, storage, or other services on the internet.
Why do we need VPC Endpoints?
Imagine you have a secure room in your house (your VPC) where you keep your valuables. Now, if you need something from a store outside, you'd typically have to step out of your secure room, go through the public space (the internet), and then come back with your item. But what if you could have a direct access point to the store from your secure room without stepping out? That's what a VPC Endpoint does – it provides a direct, secure path for your data to reach the services it needs without exposing your entire network to the public internet.
Technically, A VPC endpoint allows you to privately connect your VPC to supported AWS services without requiring an internet gateway, NAT device, VPN connection, or direct peering connection. This means your traffic stays within the AWS network, enhancing security and reducing exposure to potential threats.
Lab Steps: Setting Up a VPC Endpoint

Step 1: Log in to your AWS Account
If you don't have an AWS account, you can sign up for a free tier account. Once logged in, navigate to the AWS Management Console.
Step 2: Create a Virtual Private Cloud (VPC)
In the AWS Management Console, go to the VPC dashboard and click on "Create VPC." Follow the wizard to create a VPC with your desired configuration, including CIDR block, subnets, and route tables.
In our lab, we are creating a custom VPC with two subnets: one public subnet with internet access and the other private subnet without internet access. Instances in the public subnet can reach the internet, while instances in the private subnet cannot. We will create an Internet Gateway and attach it to our custom VPC. Additionally, we will create a custom route table for our VPC and add routes to the Internet Gateway. Furthermore, we will associate only the public subnet with the subnet association, as we want this subnet to have internet access exclusively.
VPC -

Subnets -

Route tables -


Step 3: Choose a Supported AWS Service
For this lab, let's choose Amazon S3 as the AWS service to which we want to connect via the VPC endpoint.
Step 4: Create EC2 instances
We will create one EC2 instance in the public subnet and one in the private subnet. The public subnet instance can reach the internet whereas the private subnet instance cannot.

From above, we can see that the public server has a Public IPv4 address whereas the private server doesn't.
Let's try to access the AWS S3 bucket from both servers.
To do this, first create Access keys under the Security credentials section to configure AWS CLI.
Public-server:

The public-server can access the aws s3 service as this server can reach the internet.
Private-server:

The private server doesn't have a public IP address, so we can't access it directly from the internet. Instead, we can log in to this server via the public server, which acts as a jump server. Although we have successfully logged in to the private server, we are unable to access the AWS S3 service from it.
Step 5: Create a VPC Endpoint
Go to the VPC dashboard and select "Endpoints" from the sidebar.

Click on "Create Endpoint."

Choose the AWS service (in this case, Amazon S3).

Select your VPC and subnet.

Choose a security policy. You can either use the default policy provided by AWS or create a custom policy based on your requirements.

Click "Create Endpoint" to finish.

Step 6: Test the VPC Endpoint
Now that the VPC endpoint has been created, let's test it by accessing the AWS service, S3, from an EC2 instance within the same VPC.
Next, let's attempt to list the S3 buckets by executing the AWS CLI command from the private server.

Hooray! We have successfully accessed the AWS S3 service and even created a bucket with the help of the VPC endpoint. This demonstrates the effectiveness of using VPC endpoints for secure and direct access to AWS services within our VPC environment. Great job!
Step 7: Clean Up
Once you're done experimenting, don't forget to clean up your resources to avoid unnecessary charges. Delete the VPC endpoint, EC2 instance, and any other resources you created for this lab.
Conclusion
VPC endpoints play a crucial role in securing and optimizing communication between your VPC and AWS services. By following these simple steps, even beginners and non-tech individuals can grasp the concept of VPC endpoints and learn how to set them up in a practical environment. As you continue your journey in cloud computing, understanding networking concepts like VPC endpoints will empower you to architect more secure and efficient cloud solutions.
